Kosmaz is a VoIP service provider enabling pay as you go prepaid Internet phone service and International Virtual Phone Numbers. Bring Your Own Device or BYOD voip option allow customers to connect their own voice over IP systems, SIP devices, including IP phones, softphones, and IP PBX. This single account access solution enables service to be used as home phone service, small business voip service, mobile VoIP phone, pc to phone or as calling card with need of only one account.
The question to What is VoIP is simple; VoIP stands for Voice over Internet Protocol and is a technical way of saying "using the Internet for making telephone calls. " VoIP service technology converts regular (or analog) phone calls into data (or digital) and zips them through your high-speed Internet connection.
The main benefit of VoIP service is very non-technical and simple to understand - it is cheaper than traditional phone services and has more features than you probably currently know about or use. With VoIP service you can call anywhere at anytime for less money. And it's better than your traditional line because it expands the power of your phone.
Placing a call with VoIP service is exactly the same as with any other regular phone. Just pick up the handset and dial the regular telephone number. It's that simple. You don't have to be technical or computer savvy to use VoIP service. Receiving calls also works the same. The phone will ring just like a regular phone. With VoIP service, just pick up the phone and start talking!
In more technical terms, your VoIP adapter splits your high-speed broadband connection and converts your analog signal to digital. The digital signal is sent through your modem and across the Internet. Your Internet connection will work as it did before you installed the VoIP adapter, sending emails and other Web data to your personal computer as normal. When someone calls you, they dial your regular telephone number. Behind the scenes, your number looks similar to an e-mail address. This number instructs the call to travel over the Internet to the VoIP adapter, your phone rings, and all you have to do is pick up and answer it.
VoIP service offers a number of advantages over current telephone services. Although it relies on different technology and communications that does not travel over traditional phone lines, it provides features similar to your current telephone service. This includes Call Waiting, 3-Way Calling, and Caller ID.
VoIP services also provide additional features that provide control and connectedness, such as the ability for callers to find you wherever you are, the ability to see all inbound and outbound calls over months, and the ability to listen to and manage voicemail.
A VoIP service will not work without household power or without broadband or high-speed Internet connection
Along with low domestic and international phone rates, an impressive array of special phone features are available with VoIP services. Typical service plans allow you to choose your own preferred free local dialing US area code, regardless of where you live. You can add a Virtual Phone Number in any area code, forwarded to your phone.
Some of the other advanced features included;
Voice Mail and eFeatures - See and hear messages via the Web or through your phone and forward voice messages to your e-mail account. E-mail tells you when you have a message. Forward voicemail as an e-mail attachment.
Call Logs - View a list of calls you placed and received and click on any number to automatically dial, just like on your wireless phone.
Call Forwarding - Set your service so callers can find you at other numbers when you're not at your phone.
Speed Dial - Set up single-digit shortcuts for the numbers you call the most - just like on your cell phone.
Personal Conferencing - Set up a "meeting room" with up to ten callers on the same line. Personal Conferencing is provided free of charge.
Do Not Disturb - Receive calls only when you want to. Forward calls to voicemail but allow urgent calls to ring through.
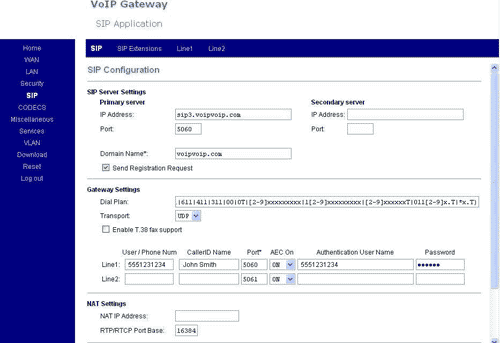
While most VoIP services insist on supplying VoIP device, which usually is locked so it only works with one service provider, with VoIPVoIP, you have the freedom to use virtually any softphone, VoIP adapter, gateway, IP phone, or IP PBX system you choose, as long as it supports SIP (Session Initiation Protocol).
You can use our VoIP service in many different ways.
The easiest way to start using VoIP Serive is using PC to phone software from your computer. Simply download free softphone to your laptop, pc and within 5 minutes you will be able to place and receive telephone calls from any high-speed / WiFi location on the planet with the lowest rates and free to other VoIP service users.
You can use your existing high-speed Internet connection at home and your existing touch-tone phone to make all your calls at a fraction of the cost of analog phone service with Home Internet Phone Service.
With Business VoIP you can use the power of VoIP and the Internet for big business telephony features on a small business budget.
With IP PBX systems, you get big business features like auto-attendant, music or message on hold, and much more for a less then ever possible and use the VoIP service network to save you money on calls and monthly service with your local telecommunications provider.
With International Toll Free Number from any 24 countries of your choice enables international customers to reach your business phone number dialing a local toll free number.
Phone Card as known as Calling Card is an affordable way to make international calls, just by dialing our access number.